Introduction: Why Sagrada Família Is a Photographer’s Dream
There are buildings you photograph, and then there’s the Sagrada Família—a structure that photographs you. It captures your breath, your attention, your sense of wonder. For photographers, this unfinished basilica isn’t just another Barcelona landmark; it’s a masterclass in light, geometry, and architectural poetry.
Antoni Gaudí didn’t just design a church; he engineered a light sculpture. Every stained-glass window, every branching column, every undulating facade was calculated to interact with natural light throughout the day and seasons. As a photographer, you’re not just documenting stone and glass—you’re capturing the interplay of divine geometry and earthly illumination.
But here’s the challenge: 4.5 million visitors annually compete for the same shots. Without strategy, you’ll join the sea of tourists snapping identical angles from crowded walkways.
This guide changes that.
Whether you’re shooting with a professional DSLR, mirrorless camera, or smartphone, you’ll discover:
- 📸 20+ specific photography spots (exterior and interior)
- 🌅 Exact timing for optimal light conditions
- ⚙️ Camera settings for challenging interior lighting
- 🤫 Secret angles away from tourist crowds
- 📱 Smartphone photography techniques for stunning results
- 🎨 Composition strategies for Gaudí’s unique architecture
- 🌦️ Seasonal considerations for year-round shooting
From the iconic reflection pool at blue hour to the ethereal glow of eastern stained glass at dawn, let’s unlock the photographic potential of Barcelona’s most extraordinary building.
Chapter 1: Exterior Photography Spots – Capturing Gaudí’s Stone Poetry
📍 Spot #1: Plaça de Gaudí Reflection Pool (The Iconic Shot)
Location: Small park directly across Carrer de Mallorca from main entrance
Best Time: Blue hour (20-40 minutes after sunset) or sunrise
Crowd Level: Moderate at blue hour; minimal at sunrise
Difficulty: Easy
Why It’s Essential: This is the Sagrada Família shot you’ve seen everywhere—and for good reason. The reflection pool creates perfect symmetry, doubling the basilica’s impact. At blue hour, when the sky turns deep indigo and the facade lights illuminate, you get that magical contrast between warm stone and cool sky.
Pro Techniques:
- Tripod Required: Essential for long exposures at blue hour
- Composition: Center the basilica for symmetry, or use rule of thirds with pool in lower third
- Settings: f/8-f/11, ISO 100-400, 1-4 second exposure at blue hour
- Smartphone: Use Night Mode or Pro mode with 2-3 second exposure
- Secret Tip: Arrive 30 minutes before sunset to secure front-row position; crowds swell quickly
Seasonal Variations:
- Summer: Sunset after 9 PM; late blue hour but warm evenings
- Winter: Sunset around 5:30 PM; earlier but colder—dress warmly
- Spring/Fall: Ideal balance; sunset 7-8 PM with comfortable temperatures
📍 Spot #2: Nativity Facade Close-Up (Gaudí’s Masterwork)
Location: Carrer de la Marina (east side)
Best Time: 8:00-10:00 AM (soft morning light)
Crowd Level: Low to moderate in early morning
Difficulty: Easy
Why It’s Essential: This is the only facade Gaudí saw completed, and every inch reveals his genius. The organic carvings—turtles, lizards, plants, biblical scenes—demand close inspection. Morning light from the east illuminates the intricate details without harsh shadows.
Pro Techniques:
- Lens Choice: 35-85mm for facade details; wide-angle (16-24mm) for full facade
- Focus Stacking: For maximum sharpness on intricate carvings, take multiple shots at different focus points
- Settings: f/5.6-f/8, ISO 200-400, 1/125s or faster
- Detail Shots: Look for the “Tree of Life” sculpture, the pelican (symbol of sacrifice), and the door of Jesus
- Smartphone: Use portrait mode for detail shots; tap to focus on specific carvings
Hidden Details to Photograph:
- The chameleon and turtle at the base (representing land and sea)
- The intricate rosary carved in stone
- Gaudí’s signature hidden in the stone carvings
- The cypress tree atop the facade (symbol of hope)
📍 Spot #3: Passion Facade Drama (Angular Contrast)
Location: Carrer de Sardenya (west side)
Best Time: 4:00-6:30 PM (afternoon light creates dramatic shadows)
Crowd Level: Moderate
Difficulty: Easy
Why It’s Essential: Josep Maria Subirachs’ stark, angular sculptures contrast dramatically with the ornate Nativity Facade. This facade tells the story of Christ’s suffering through bare, bone-like stone. Late afternoon light rakes across the surface, emphasizing every angular plane and creating powerful shadows.
Pro Techniques:
- Black & White: This facade screams for monochrome conversion—emphasize contrast and texture
- Lens Choice: 24-70mm for facade; 70-200mm for sculptural details
- Settings: f/8-f/11, ISO 200-400, adjust shutter for proper exposure
- Composition: Use leading lines from the angular columns; frame the “Kiss of Judas” or crucifixion scenes
- Magic Square: Don’t miss the famous numerological puzzle where all rows/columns add to 33
Best Angles:
- Low angle: Emphasizes the imposing, skeletal nature of the columns
- Straight-on: Captures the full narrative sequence of sculptures
- Detail shots: Focus on individual figures—their angularity is striking
📍 Spot #4: Glory Facade Construction (Living History)
Location: Carrer de Mallorca (south side, main entrance)
Best Time: Midday (overhead light shows construction details)
Crowd Level: Low (least photographed facade)
Difficulty: Moderate
Why It’s Essential: This will be the main entrance when completed, but it’s currently under active construction. For documentary photographers, this is gold—capturing the basilica as a living, evolving work. The contrast of ancient vision and modern construction tells the ongoing story.
Pro Techniques:
- Documentary Style: Capture cranes, workers, unfinished stone
- Juxtaposition: Frame construction equipment against completed sections
- Settings: f/5.6-f/8, ISO 400-800 (depending on light), fast shutter for moving cranes
- Ethics: Be respectful of workers; don’t obstruct construction zones
- Future Value: These photos will be historically significant once construction completes
Unique Shots:
- Time-lapse of construction activity (requires permission)
- Workers silhouetted against stone
- The contrast of modern safety equipment with centuries-old techniques
📍 Spot #5: Aerial Perspective from Nearby Rooftops
Location:
- Hospital de Sant Pau (10-min walk; rooftop terrace)
- Torre Glòries (15-min walk; observation deck)
- Nearby hotel terraces (some offer guest/paid access)
Best Time: Golden hour (1 hour before sunset)
Crowd Level: Varies by location
Difficulty: Moderate (requires travel between locations)
Why It’s Essential: Ground-level shots are stunning, but seeing the Sagrada Família rise above Barcelona’s skyline provides context and scale. You’ll capture the full silhouette of the towers against the city and Mediterranean beyond.
Pro Techniques:
- Lens Choice: 70-200mm telephoto to compress distance and isolate basilica
- Settings: f/8-f/11, ISO 100-400, tripod recommended for telephoto work
- Composition: Include Barcelona’s streets leading to the basilica for leading lines
- Panorama: Stitch multiple shots for ultra-wide cityscape including Sagrada Família
- Permissions: Verify photography policies at each location; some require fees
Best Rooftop Locations:
- Hospital de Sant Pau: Modernist complex with terrace; €12 entry includes terrace access
- Torre Glòries: 30th-floor observation; €9 entry; 360° city views
- Hotel rooftops: Some bars/restaurants offer terrace access with purchase
📍 Spot #6: Street-Level Leading Lines
Location: Carrer de Mallorca, Carrer de la Marina, Carrer de Sardenya
Best Time: Early morning (7-9 AM) or late afternoon (5-7 PM)
Crowd Level: Low early morning; moderate afternoon
Difficulty: Easy
Why It’s Essential: Barcelona’s grid pattern creates perfect leading lines toward the Sagrada Família. Shooting down these streets with the basilica as the vanishing point creates powerful perspective and draws viewers into the frame.
Pro Techniques:
- Lens Choice: Wide-angle (16-35mm) to exaggerate perspective
- Aperture: f/11-f/16 for deep depth of field (sharp from foreground to basilica)
- Composition: Position yourself in center of street for symmetry; use crosswalks or tram tracks as leading lines
- Timing: Early morning means fewer cars and pedestrians; cleaner compositions
- Smartphone: Use wide-angle lens; enable grid lines for straight perspective
Best Streets:
- Carrer de Mallorca: Classic frontal view; reflection pool visible
- Carrer de la Marina: Nativity Facade perspective
- Carrer de Sardenya: Passion Facade angle
Chapter 2: Interior Photography Spots – Capturing Light as Architecture
⚠️ Interior Photography Rules (2026)
Before we dive into specific spots, know the rules: ✅ Allowed: Personal photography without flash, handheld or monopod
✅ Allowed: Video recording without flash
✅ Allowed: Tripods during low-crowd times (verify with staff; generally discouraged during peak hours)
❌ Prohibited: Flash photography (damages stained glass and disturbs worshippers)
❌ Prohibited: Selfie sticks, monopods that obstruct pathways
❌ Prohibited: Commercial photography without permit
❌ Prohibited: Photography during Mass or religious services
Respectful Photography:
- Never block pathways for extended shooting
- Be mindful of worshippers; don’t photograph people in prayer without permission
- Keep voice low; this is an active place of worship
- Follow staff instructions immediately
📍 Spot #7: Central Nave Looking Up (The Forest Canopy)
Location: Center of main nave, directly beneath highest vaults
Best Time: 10:00 AM – 2:00 PM (balanced overhead light)
Crowd Level: Moderate to high
Difficulty: Easy
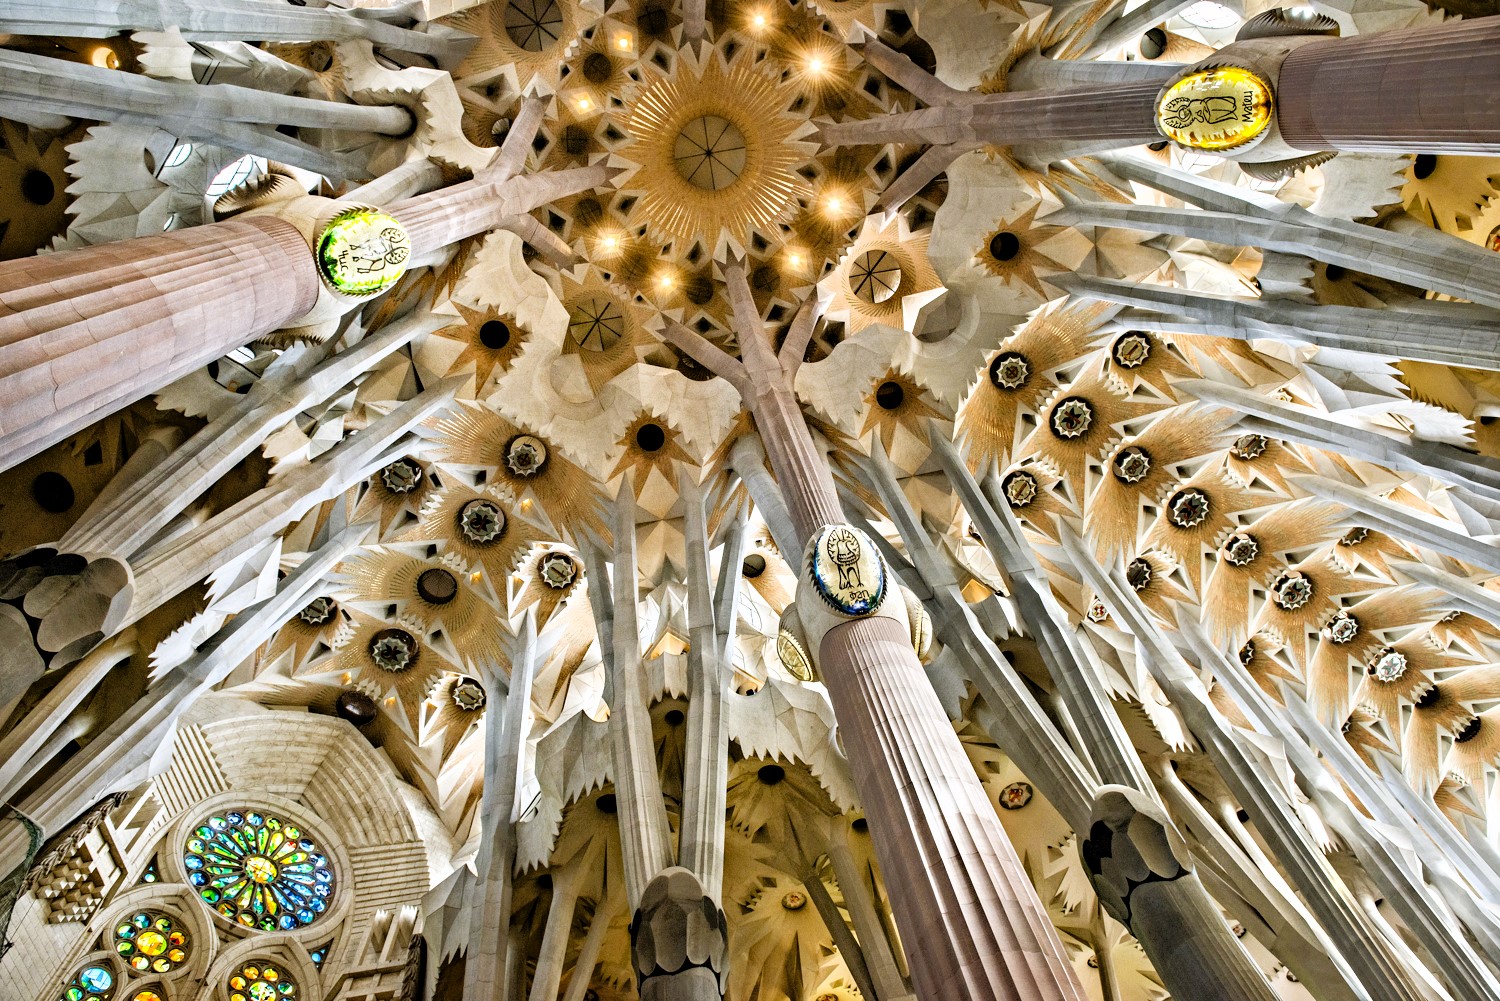
Why It’s Essential: This is Gaudí’s revolutionary vision realized: columns that branch like trees, supporting a canopy of stone and light. Looking straight up reveals the hyperboloid geometry and fractal patterns that make this space unlike any cathedral on Earth.
Pro Techniques:
- Lens Choice: Ultra-wide (14-24mm) or fisheye for maximum impact
- Settings: f/4-f/5.6, ISO 800-1600 (interiors are darker than they appear), 1/60s or faster handheld
- Focus: Set to infinity or focus one-third into the scene for maximum sharpness
- Composition: Center the branching columns for symmetry; or shoot from corner for dynamic diagonal lines
- Smartphone: Use ultra-wide lens; enable HDR for balanced exposure
Technical Challenge: The dynamic range is extreme—bright stained glass vs. shadowed stone. Use:
- RAW format for maximum editing flexibility
- Exposure bracketing: Shoot 3-5 exposures and blend in post
- Spot metering: Meter off mid-tones (stone columns, not windows)
Best Compositions:
- Straight up: Pure geometry and symmetry
- 45-degree angle: Shows both columns and vaults
- From side aisle: Columns create framing for central nave
📍 Spot #8: East Stained Glass (Cool Blues & Greens)
Location: Eastern side of nave, near Nativity Facade
Best Time: 9:00-11:00 AM (morning sun activates colors)
Crowd Level: Moderate
Difficulty: Easy
Why It’s Essential: Gaudí designed the eastern windows with cool tones (blues, greens, turquoise) to represent birth, hope, and dawn. When morning light streams through, the entire east side of the nave glows with ethereal, aquatic colors. The light projects jewel-toned patterns onto the stone columns and floor.
Pro Techniques:
- Lens Choice: 24-70mm for window details; 16-35mm for light patterns on columns
- Settings: f/2.8-f/4 (let in maximum light), ISO 1600-3200, 1/60s or faster
- White Balance: “Daylight” or “Cloudy” preset enhances warm tones; avoid Auto WB which neutralizes the magic
- Focus: On the light patterns projected on floor/columns, not the glass itself
- Composition: Frame columns bathed in colored light; capture light patterns on stone floor
Capturing Light Patterns:
- Floor shots: Get low (kneel or lie down respectfully) to photograph colored light on stone
- Column close-ups: The way light wraps around branching columns is mesmerizing
- Silhouettes: Position people (with permission) as silhouettes against glowing glass
Smartphone Tips:
- Tap to focus on the light patterns, not the bright windows
- Slide exposure down slightly to prevent blown-out highlights
- Use portrait mode for artistic blur of background
📍 Spot #9: West Stained Glass (Warm Reds & Oranges)
Location: Western side of nave, near Passion Facade
Best Time: 3:00-5:30 PM (afternoon sun ignites warm tones)
Crowd Level: Moderate (thinning after 4 PM)
Difficulty: Easy
Why It’s Essential: The western windows use warm tones (reds, oranges, purples) to represent sacrifice, sunset, and redemption. Afternoon light transforms this side into a fiery, dramatic space. The contrast between the cool east and warm west creates a spiritual journey from birth to sacrifice.
Pro Techniques:
- Lens Choice: 24-70mm for window details; 35mm for atmospheric wide shots
- Settings: f/2.8-f/4, ISO 1600-3200, 1/60s or faster
- White Balance: “Shade” or “Cloudy” enhances warmth; experiment with Kelvin (6000-7000K)
- Composition: Capture the gradient from cool (center nave) to warm (west side)
- Golden Hour Magic: In summer, 5-6 PM light is absolutely spectacular
Dramatic Shots:
- Silhouettes: Position people against glowing red/orange glass
- Column contrast: Show one column half in blue light, half in red light
- Floor patterns: Warm light creates different patterns than cool light—capture both
Seasonal Variation:
- Winter: Afternoon light is lower angle, more dramatic but shorter duration
- Summer: Extended golden hour; light penetrates deeper into nave
- Overcast days: Colors are softer but more evenly lit—actually easier to photograph
📍 Spot #10: Altar & Canopy (Spiritual Center)
Location: Central altar beneath main canopy
Best Time: 10:00 AM – 4:00 PM (balanced light)
Crowd Level: Moderate (people move through quickly)
Difficulty: Easy
Why It’s Essential: The altar is the spiritual and visual center of the basilica. The suspended canopy (designed by Gaudí, completed posthumously) creates a focal point beneath the highest vaults. Light from above illuminates the space with divine presence.
Pro Techniques:
- Lens Choice: 24-70mm for altar details; 16-35mm for wide context
- Settings: f/4-f/5.6, ISO 800-1600, 1/60s or faster
- Composition: Center the altar for symmetry; use columns as framing elements
- Respect: Never photograph during Mass; be extremely discreet and quiet
- Details: Photograph the suspended canopy, the altar itself, and light from above
Worship Etiquette:
- If Mass is occurring, photography is prohibited
- Keep distance; don’t approach altar area if restricted
- Never use flash
- Dress respectfully (shoulders and knees covered)
📍 Spot #11: Spiral Staircase in Towers (If You Have Tower Access)
Location: Nativity or Passion towers (requires tower ticket)
Best Time: During your tower visit time slot
Crowd Level: Varies by time slot
Difficulty: Moderate (tight spaces, limited light)
Why It’s Essential: The narrow spiral staircases descending from the towers offer unique perspectives and intimate architectural details. The tight geometry, aged stone, and limited light create moody, dramatic images impossible elsewhere in the basilica.
Pro Techniques:
- Lens Choice: Wide-angle (16-24mm) for tight spaces
- Settings: f/2.8-f/4 (maximum aperture), ISO 3200-6400 (very dark), 1/30s or slower (use railing for stability)
- Composition: Shoot straight up or down the spiral for hypnotic geometry
- Challenge: Extremely tight spaces; be mindful of other visitors
- Safety: Hold handrail; don’t block staircase for extended shooting
Unique Shots:
- Looking down: The spiral creates a vortex effect
- Looking up: Light from above creates dramatic shafts
- Detail textures: Aged stone, iron railings, worn steps
- Abstract: Focus on curves and lines rather than literal representation
Important Notes:
- Tripods usually NOT permitted in towers (too narrow)
- Be quick and respectful; others need to descend
- Watch your step; stairs are narrow and uneven
📍 Spot #12: Museum & Crypt (Historical Context)
Location: Basement level
Best Time: Anytime during visit (less crowded than main level)
Crowd Level: Low to moderate
Difficulty: Easy
Why It’s Essential: The museum houses Gaudí’s original models, drawings, and the fragments of his plaster models destroyed in 1936. The crypt contains Gaudí’s tomb and Villar’s original neo-Gothic design. These spaces provide crucial historical context and intimate details.
Pro Techniques:
- Lens Choice: 24-70mm for general shots; macro lens for model details
- Settings: f/4-f/5.6, ISO 800-1600, 1/60s or faster
- Museum Models: Get close to show craftsmanship; use shallow depth of field for artistic effect
- Crypt: Lower light; increase ISO; be extremely respectful
- Gaudí’s Tomb: Simple, dignified compositions; no flash
Must-Photograph Items:
- Fragments of Gaudí’s destroyed models (salvaged from debris)
- Original drawings and plans
- The hanging chain model (or photographs of it)
- Gaudí’s tomb in the crypt
- Villar’s neo-Gothic crypt design (contrast with Gaudí’s work above)
Chapter 3: Optimal Timing for Photography – Light, Seasons & Crowds
🌅 Best Times of Day
| Time | Light Quality | Crowd Level | Best For |
|---|---|---|---|
| 8:00-9:00 AM | Soft, directional | LOW | Exterior facades, reflection pool, street leading lines |
| 9:00-11:00 AM | Bright, cool tones | Moderate | East stained glass, Nativity Facade details |
| 11:00 AM-2:00 PM | Harsh overhead | HIGH | Interior vaults, central nave, museum |
| 2:00-4:00 PM | Warm, directional | High | Interior balanced light, altar area |
| 4:00-6:00 PM | Golden, dramatic | Moderate | West stained glass, Passion Facade |
| 6:00-8:00 PM | Sunset/golden hour | Low-Moderate | Exterior silhouette, reflection pool setup |
| 8:00-9:00 PM | Blue hour | Moderate | Reflection pool iconic shot, illuminated facade |
Pro Strategy:
- Sunrise (7-8 AM summer; 8-9 AM winter): Exterior only (basilica not open), but capture empty streets and soft light on facades
- First entry (9 AM): Enter immediately, photograph east side while light is perfect, then move through as crowds build
- Late afternoon (4-5 PM): West side stained glass is spectacular; crowds thinning
- Blue hour (after closing): Exterior reflection pool without interior access
📅 Seasonal Photography Guide
🌸 Spring (March-May)
Pros:
- Mild temperatures (15-22°C / 59-72°F)
- Clear skies common
- Long daylight hours by May
- Gardens and surroundings bloom
Cons:
- Increasing crowds toward May
- Occasional rain (actually enhances interior colors)
Best For: Balanced exterior/interior photography; comfortable shooting conditions
Photography Tips:
- Overcast days reduce exterior contrast but enhance interior stained glass
- Pack rain protection for gear
- Golden hour extends later (8-9 PM by May)
☀️ Summer (June-August)
Pros:
- Longest days (sunset after 9 PM in June)
- Extended blue hour
- Vibrant atmosphere
Cons:
- Peak crowds (4.5M annual visitors concentrated here)
- Heat (22-30°C / 72-86°F)
- Harsh midday light
- Highest prices
Best For: Blue hour photography; extended shooting days
Photography Tips:
- Avoid midday (12-3 PM): Harsh light + peak crowds + heat
- Prioritize early morning (8-10 AM) and evening (6-9 PM)
- Blue hour is spectacular but crowded at reflection pool
- Bring water, sun protection, and patience
🍂 Fall (September-November)
Pros:
- Pleasant temperatures (14-24°C / 57-75°F)
- Decreasing crowds after October
- Soft, golden light
- Dramatic skies possible
Cons:
- Shorter days by November
- Increased rain chance
Best For: Overall best season for photography—light, crowds, and comfort align
Photography Tips:
- October light is exceptional—clear air, golden tones
- Overcast days enhance interior colors
- Fewer tourists means more shooting freedom
- Blue hour earlier (6-7 PM) but still beautiful
❄️ Winter (December-February)
Pros:
- Lowest crowds (except holiday weeks)
- Soft, low-angle light
- Dramatic atmosphere
- Lower prices
Cons:
- Shortest days (sunset ~5:30 PM)
- Cool temperatures (8-15°C / 46-59°F)
- Possible rain
Best For: Contemplative photography; minimal crowds; budget travelers
Photography Tips:
- Maximize midday light: Interior best 11 AM-2 PM when light is brightest
- Blue hour is early (6-6:30 PM) but still magical
- Low winter sun creates long shadows on facades—dramatic for exterior work
- Dress warmly for exterior shooting
- Holiday decorations (December) add festive elements
📆 Day-of-Week Strategy
| Day | Crowd Level | Photography Friendliness |
|---|---|---|
| Tuesday-Wednesday | LOWEST | ⭐⭐⭐⭐⭐ Best for photography |
| Thursday | Low | ⭐⭐⭐⭐ Excellent |
| Monday | Moderate | ⭐⭐⭐ Good (some weekend spillover) |
| Friday | Moderate-High | ⭐⭐ Challenging |
| Saturday | HIGH | ⭐ Difficult (crowds) |
| Sunday | HIGH (afternoon) | ⭐ Difficult (limited morning access for Mass) |
Pro Recommendation: Tuesday or Wednesday, 9 AM entry is the golden ticket for photographers.
Chapter 4: Camera Settings & Technical Guide
📷 Recommended Settings by Scenario
Exterior Facades (Daylight)
Mode: Aperture Priority (A/Av) or Manual
Aperture: f/8-f/11 (sharpness across facade)
ISO: 100-200 (base ISO for quality)
Shutter: 1/125s or faster (handheld)
White Balance: Daylight or Cloudy
Focus: Single-point AF on architectural details
Format: RAW + JPEG
Interior Stained Glass
Mode: Aperture Priority (A/Av)
Aperture: f/2.8-f/4 (maximum light)
ISO: 1600-3200 (don't fear high ISO)
Shutter: 1/60s minimum (handheld)
White Balance: Cloudy or Shade (enhances warmth)
Focus: Single-point AF on light patterns
Format: RAW (essential for dynamic range)
Metering: Spot or Center-weighted
Exposure Compensation: -0.3 to -1.0 EV (protect highlights)
Interior Vaults (Looking Up)
Mode: Manual
Aperture: f/4-f/5.6
ISO: 800-1600
Shutter: 1/60s or faster
White Balance: Auto or Daylight
Focus: Manual or single-point on columns
Format: RAW
Bracketing: ±1 EV, 3 frames (blend in post)
Blue Hour Reflection Pool
Mode: Manual
Aperture: f/8-f/11
ISO: 100-400
Shutter: 1-4 seconds (adjust for exposure)
White Balance: Daylight or Tungsten (experiment)
Focus: Manual focus on basilica
Format: RAW + JPEG
Tripod: ESSENTIAL
Remote/Timer: 2-second delay or cable release
Tower Spiral Staircase
Mode: Aperture Priority (A/Av)
Aperture: f/2.8 (widest available)
ISO: 3200-6400 (very dark)
Shutter: 1/30s or slower (stabilize on railing)
White Balance: Auto
Focus: Single-point AF
Format: RAW
Image Stabilization: ON
🎒 Essential Gear Checklist
Must-Have Equipment
✅ Camera body: Any DSLR, mirrorless, or advanced smartphone
✅ Wide-angle lens: 16-35mm (full-frame) or 10-24mm (APS-C)
✅ Standard zoom: 24-70mm for versatility
✅ Extra batteries: Minimum 2 (cold drains batteries faster)
✅ Memory cards: High-capacity, fast write speed (64GB+ recommended)
✅ Lens cloth: Interior humidity causes fogging
✅ Comfortable bag: Small enough to not obstruct others
Nice-to-Have
🔸 Telephoto lens: 70-200mm for rooftop/cityscape shots
🔸 Tripod: For blue hour exterior (check if permitted inside)
🔸 Polarizing filter: Reduces glare on stained glass (exterior use)
🔸 ND filter: For long exposures at blue hour
🔸 Remote shutter release: For tripod work
🔸 Portable battery: For smartphone photographers
Smartphone-Specific Gear
📱 Clip-on lenses: Wide-angle and telephoto attachments
📱 Mini tripod: For blue hour stability
📱 Lens attachment kit: Moment or Sandmarc lenses
📱 Portable battery pack: Extended shooting drains phone
📱 Smartphone Photography Masterclass
You don’t need a $3,000 camera. Modern smartphones can capture stunning Sagrada Família images.
iPhone Pro Tips
- Use ProRAW: Settings > Camera > Formats > Apple ProRAW (maximum quality)
- Manual controls: Use third-party app like Halide or ProCamera
- Night Mode: Automatic in low light; keep phone steady
- Portrait mode: Use for architectural details (creates pleasing blur)
- Live Photos: Capture motion; convert to long exposure in Photos app
- Grid lines: Settings > Camera > Grid (composition aid)
- Exposure lock: Tap and hold on screen to lock AE/AF
Android Pro Tips
- RAW capture: Enable in camera settings (Samsung: Pro mode; Google Pixel: use GCam)
- Pro mode: Manual ISO, shutter, white balance control
- Night Sight: Google Pixel’s computational photography excels in low light
- Portrait mode: For detail shots with bokeh
- HDR+: Automatic on Pixel; enhances dynamic range
- Grid lines: Enable in settings for composition
Universal Smartphone Techniques
- Clean your lens: Wipe with microfiber before shooting
- Tap to focus: Always tap your subject, don’t rely on auto
- Exposure compensation: Slide down to prevent blown highlights
- Shoot in RAW: If available, gives editing flexibility
- Use volume buttons: As shutter release to reduce shake
- Burst mode: For moving subjects or bracketing
- Edit thoughtfully: Use Lightroom Mobile, Snapseed, or VSCO
Chapter 5: Composition Strategies for Gaudí’s Architecture
📐 Gaudí-Specific Composition Techniques
1. Organic Curves Over Straight Lines
Gaudí rejected right angles. Your compositions should celebrate curves:
- Frame branching columns as they split toward the ceiling
- Follow the undulating facade lines
- Use curved staircases as leading lines
- Emphasize hyperboloid shapes in towers
Technique: Look for S-curves, spirals, and flowing forms rather than rigid geometry.
2. Fractal Patterns & Repetition
Gaudí used fractal geometry—patterns that repeat at different scales:
- Photograph a column base, then the branching top
- Show how small decorative elements echo larger structural forms
- Capture the repetition of columns down the nave
Technique: Use telephoto compression to show repeating patterns; or wide-angle to show scale progression.
3. Light as Subject
Don’t just photograph architecture illuminated by light—photograph the light itself:
- Capture colored light projected on stone floors
- Show light shafts penetrating the space
- Frame silhouettes against glowing stained glass
- Document the gradient from cool (east) to warm (west)
Technique: Expose for the light patterns, not the architecture. Let stone go dark to emphasize luminosity.
4. Nature References
Gaudí designed columns like trees, vaults like canopies, facades like living organisms:
- Compose columns to emphasize their tree-like branching
- Frame the nave as a forest
- Show organic details (leaf carvings, animal sculptures)
Technique: Use low angles to make columns appear to grow upward like trees.
5. Sacred Geometry
Gaudí embedded mathematical perfection:
- Center compositions for symmetry
- Use golden ratio framing
- Highlight geometric patterns (hyperboloids, parabolas, helices)
- Show the precision of natural forms
Technique: Enable grid lines; align architectural elements with rule-of-thirds intersections.
🎨 Advanced Composition Ideas
The “Gaudí Triptych”
Create a three-image series:
- Exterior: Nativity Facade detail (life, birth)
- Interior: East stained glass (cool tones, hope)
- Interior: West stained glass (warm tones, sacrifice)
This tells the complete spiritual story through light and form.
“Then & Now” Juxtaposition
If you have historical photos (or can find them online):
- Recreate the exact angle
- Show construction progress
- Document the evolution
This has documentary and artistic value.
“Light Journey” Sequence
Photograph the same interior spot at different times:
- 9 AM: Cool eastern light
- 12 PM: Balanced overhead light
- 4 PM: Warm western light
Create a time-lapse or triptych showing light’s transformation.
“Scale & Human Element”
Include people (respectfully) to show scale:
- Tiny figures beneath massive columns
- Silhouettes against stained glass
- Worshippers in prayer (with permission)
This adds emotional resonance and perspective.
Chapter 6: Nearby Photography Locations – Beyond the Basilica
📍 Location #1: Hospital de Sant Pau (10-min walk)
Why Visit: Another UNESCO World Heritage Modernisme complex designed by Lluís Domènech i Montaner. The contrast with Gaudí’s work is fascinating.
Photography Opportunities:
- Art Nouveau pavilions with colorful mosaics
- Underground tunnels with dramatic light
- Rooftop terrace with Sagrada Família views
- Gardens and decorative sculptures
Best Time: Morning light illuminates facades beautifully
Entry Fee: ~€15 (includes rooftop access)
Photography: Allowed; less crowded than Sagrada Família
📍 Location #2: Torre Glòries (15-min walk)
Why Visit: Jean Nouvel’s iconic bullet-shaped tower offers 360° Barcelona views, including Sagrada Família from above.
Photography Opportunities:
- Sagrada Família in cityscape context
- Mediterranean Sea and mountains
- Barcelona’s grid pattern
- Sunset and blue hour city lights
Best Time: Sunset (arrive 1 hour before)
Entry Fee: ~€9
Photography: Allowed; tripods may be restricted
📍 Location #3: Park Güell (20-min by Metro)
Why Visit: Gaudí’s whimsical park showcases his early organic style and offers elevated Sagrada Família views.
Photography Opportunities:
- Sagrada Família in distance (telephoto compression)
- Trencadís mosaics (similar technique to Sagrada Família)
- Organic architectural forms
- Barcelona cityscape
Best Time: Early morning (8 AM opening) to avoid crowds
Entry Fee: ~€10 (monumental core)
Photography: Allowed; very crowded midday
📍 Location #4: Bunkers del Carmel (30-min by bus)
Why Visit: Abandoned anti-aircraft bunkers with panoramic Barcelona views. Popular with locals for sunset.
Photography Opportunities:
- Sagrada Família in cityscape
- 360° Barcelona panorama
- Sunset and blue hour
- Urban exploration aesthetic
Best Time: Sunset (arrive 1 hour before)
Entry Fee: FREE
Photography: Allowed; bring tripod; can be crowded
Note: Respect the neighborhood; no loud music or littering.
📍 Location #5: Carrer de Mallorca Street Photography
Why Visit: The streets surrounding Sagrada Família offer candid moments, local life, and leading lines.
Photography Opportunities:
- Street vendors and tourists
- Architectural details of surrounding buildings
- Leading lines toward basilica
- Barcelona daily life
Best Time: Early morning or late afternoon
Entry Fee: FREE
Photography: Allowed; be respectful of people (ask permission for portraits)
Chapter 7: Photography Etiquette & Respectful Practices
⛪ Remember: This Is a Place of Worship
While Sagrada Família is a major tourist attraction, it remains an active Catholic basilica. Respectful photography is essential.
✅ Do:
- Keep voice low when shooting
- Move quickly; don’t block pathways for extended periods
- Ask permission before photographing individuals in prayer
- Follow staff instructions immediately
- Dress appropriately (shoulders and knees covered)
- Be patient; wait for crowds to move for clean shots
- Use silent shutter mode if available
❌ Don’t:
- Use flash (damages artwork, disturbs worshippers)
- Set up tripods during peak hours (obstructs flow)
- Lie on floor for extended periods (even for “artistic” shots)
- Touch stained glass or architectural elements
- Photograph during Mass (strictly prohibited)
- Use selfie sticks (prohibited inside)
- Be pushy or aggressive for shots
- Ignore “no photography” signs in sensitive areas
👥 People Photography Ethics
Tourists:
- Generally acceptable in wide shots
- For close-ups or portraits, ask permission
- Respect if someone declines
- Don’t photograph children without parent permission
Worshippers:
- Never photograph people in prayer without explicit permission
- This is deeply personal and sacred
- If in doubt, don’t shoot
Staff & Workers:
- Ask before photographing construction workers
- Security staff may have restrictions; comply immediately
- Don’t interfere with their duties for photos
🏗️ Construction Zone Respect
The Sagrada Família is an active construction site:
- Stay behind barriers
- Don’t photograph restricted areas
- Respect workers’ space and safety
- Don’t touch construction materials or equipment
- Follow all safety signage
Chapter 8: Post-Processing Tips for Sagrada Família Photos
🎨 Editing Workflow
For Stained Glass Interior Shots
- RAW Development:
- Recover highlights (stained glass often blows out)
- Lift shadows (stone columns are dark)
- Adjust white balance (enhance warm/cool tones)
- Color Grading:
- Boost saturation of blues/greens (east) or reds/oranges (west)
- Use HSL panel to target specific colors
- Avoid oversaturation; keep it natural
- Contrast & Clarity:
- Increase clarity for architectural detail
- Add contrast for drama
- Use dehaze sparingly (can look artificial)
- Lens Corrections:
- Enable profile corrections (fix distortion)
- Remove chromatic aberration
- Correct perspective (vertical lines should be vertical)
For Exterior Facades
- Perspective Correction:
- Use transform tools to straighten verticals
- Converging verticals look amateurish
- Lightroom: Transform > Auto or Guided
- Dynamic Range:
- Recover highlights (bright sky)
- Lift shadows (facade details)
- Consider graduated filter for sky
- Sharpening:
- Apply moderate sharpening
- Use masking to protect smooth areas
- Amount: 40-60; Radius: 1.0; Detail: 25-35
For Blue Hour Reflection Pool
- Exposure Blending:
- If you bracketed, blend exposures
- HDR or manual layer masking
- Maintain natural look; avoid “HDR halo”
- Color Temperature:
- Blue hour = cool tones (8000-10000K)
- Enhance blues in sky and water
- Warm up illuminated facade slightly for contrast
- Reflection Enhancement:
- Increase clarity on water
- Boost contrast for mirror effect
- Remove ripples if distracting (healing tool)
📱 Mobile Editing Apps
Best Apps for Sagrada Família Photos:
- Lightroom Mobile: Professional RAW editing; free version excellent
- Snapseed: Google’s powerful free editor; great for selective adjustments
- VSCO: Film-like presets; subtle, artistic looks
- SKRWT: Best for perspective correction on mobile
- TouchRetouch: Remove tourists and distractions
- Darkroom: Advanced editing for iPhone users
Quick Mobile Edit Workflow:
- Import RAW (if available)
- Auto-enhance as starting point
- Adjust exposure and contrast
- Correct perspective (verticals)
- Enhance colors (selective saturation)
- Sharpen and export
Chapter 9: Frequently Asked Questions – Photography Edition
❓ Is photography allowed inside Sagrada Família?
A: Yes, personal photography without flash is permitted. Video is also allowed without flash. However:
- No photography during Mass
- No commercial photography without permit
- No flash (damages artwork)
- No tripods during peak hours (obstructs pathways)
- Always respect worshippers and staff instructions
❓ Can I use a tripod inside?
A: Technically yes, but practically no during busy times. Official policy allows tripods, but:
- They obstruct pathways in crowded conditions
- Staff may ask you to remove them during peak hours
- Best used only during very early/late visits with low crowds
- Consider a monopod as compromise (less obstructive)
Pro Tip: For blue hour exterior shots at reflection pool, tripods are fine and recommended.
❓ What’s the best camera for Sagrada Família?
A: Any camera you’re comfortable with! Options:
- Smartphone: Modern phones (iPhone 13+, Google Pixel 6+, Samsung S22+) produce excellent results
- Mirrorless/DSLR: Full-frame or APS-C with wide-angle lens (16-35mm)
- Compact camera: High-end compacts (Sony RX100, Canon G7X) work well
Key features:
- Good low-light performance (high ISO capability)
- Wide-angle lens (essential for interiors)
- RAW capture (for editing flexibility)
- Image stabilization (helps in low light)
❓ Are drones allowed?
A: NO. Drone photography is strictly prohibited:
- Barcelona has strict no-fly zones
- Sagrada Família is in restricted airspace
- Privacy and safety concerns
- Potential fines and legal consequences
Alternative: Use rooftop locations (Torre Glòries, Hospital de Sant Pau) for elevated perspectives.
❓ Can I sell photos of Sagrada Família?
A: Commercial use requires permission.
- Personal use: Free (share on social media, personal portfolio)
- Editorial use: Generally allowed (news, education) with credit
- Commercial use: Requires licensing agreement with Sagrada Família Foundation
When in doubt: Contact sagradafamilia.org for commercial licensing.
❓ How do I photograph without crowds?
A: Strategies:
- Visit early: First entry (9 AM) on Tuesday/Wednesday
- Visit late: Last entry slot (crowds thin after 4 PM)
- Low season: January-February (excluding holidays)
- Long exposures: 1-2 second exposures blur moving people (requires tripod)
- Patience: Wait for people to move through frame
- Perspective: Shoot up at vaults or down at floor patterns (fewer people in frame)
- Post-processing: Remove tourists with Photoshop Content-Aware Fill or similar tools
❓ What if my photos are too dark inside?
A: Common problem; solutions:
- Increase ISO: Don’t fear 3200-6400 ISO; modern cameras handle it well
- Wider aperture: Use f/2.8 or wider
- Slower shutter: 1/30s or slower (stabilize on railing/column)
- Image stabilization: Enable in-camera or lens IS
- Shoot RAW: Recover shadows in post-processing
- Exposure bracketing: Blend multiple exposures later
Remember: Interiors are darker than they appear to your eyes. Your camera needs more light.
❓ Can I photograph the towers from inside?
A: If you have tower access tickets, yes! You can photograph:
- Views from tower terraces
- Spiral staircase descending
- Close-up details of spires
- Barcelona cityscape
Restrictions:
- No tripods in towers (too narrow)
- Be quick; don’t block staircase
- Follow safety guidelines
❓ Is professional photography allowed?
A: Requires advance permission and permit.
- Professional = commercial use, models, extensive equipment, or planned shoots
- Contact Sagrada Família Foundation well in advance
- Fees apply
- Restrictions on timing and areas
Casual enthusiasts with nice cameras are fine for personal use.
Chapter 10: Your Photography Checklist – From Planning to Post-Processing
📋 Pre-Visit Preparation (1 Week Before)
☐ Book tickets with tower access if desired (4-6 weeks ahead for peak season)
☐ Choose optimal day/time (Tuesday/Wednesday, 9 AM or 4 PM)
☐ Check weather forecast (overcast = better interior colors)
☐ Charge all batteries (camera, phone, accessories)
☐ Format memory cards (bring backups)
☐ Download apps: Lightroom Mobile, official Sagrada Família audio guide
☐ Clean lenses (microfiber cloth)
☐ Pack gear: Camera, lenses, extra batteries, memory cards, lens cloth
☐ Review dress code: Pack scarf/shawl if needed (shoulders/knees covered)
☐ Research compositions: Save inspiration photos to your phone
📋 Day Before Visit
☐ Confirm ticket time and entry requirements
☐ Set phone alarms for departure time
☐ Pack bag: Camera gear, water, snacks, ID, ticket (printed + digital)
☐ Charge devices overnight
☐ Check sunrise/sunset times for blue hour planning
☐ Review Metro route (L2 or L5 to Sagrada Família station)
☐ Rest well (photography requires energy and patience)
📋 Day Of – Morning
☐ Arrive 30 minutes early for exterior shots
☐ Photograph reflection pool if visiting at blue hour previous evening
☐ Capture empty streets and soft morning light on facades
☐ Enter at opening (9 AM) for minimal crowds
☐ Start with east side (Nativity Facade, cool stained glass) while light is perfect
☐ Move systematically: Exterior → Interior east → Interior west → Museum → Towers (if booked)
📋 During Your Visit
☐ Shoot in RAW (maximum quality)
☐ Bracket exposures for high-contrast scenes
☐ Vary compositions: Wide, medium, detail, abstract
☐ Capture light patterns on floors and columns
☐ Document details: Carvings, symbols, textures
☐ Be respectful: Of worshippers, other visitors, staff
☐ Stay flexible: Adapt to crowds and light conditions
☐ Take breaks: Sit, absorb, reflect (not just shoot)
☐ Backup photos: If possible, offload to phone/cloud during lunch
📋 Post-Visit (Same Day)
☐ Backup all photos to computer + external drive + cloud
☐ Cull images: Delete obvious failures; star best shots
☐ Basic edits: Exposure, white balance, cropping
☐ Share selectively: Choose 3-5 best for social media
☐ Journal notes: What worked, what didn’t, ideas for next visit
☐ Rest: Photography is mentally and physically demanding
📋 Post-Processing (Within 1 Week)
☐ Organize files: Folder structure (Date_Location_Event)
☐ Develop RAW files: Lightroom, Capture One, or similar
☐ Apply lens corrections: Distortion, chromatic aberration
☐ Color grading: Enhance stained glass colors naturally
☐ Perspective correction: Straighten verticals
☐ Export: High-res for print; web-res for sharing
☐ Create portfolio: Select 10-20 best images
☐ Print favorites: Physical prints have special value
☐ Share story: Blog, social media, or photo book
Conclusion: Your Lens on the Divine
Photographing the Sagrada Família is more than capturing stone and glass. It’s about documenting light as it was meant to be seen—filtered through color, shaped by geometry, elevated by faith.
Antoni Gaudí designed this space to be experienced, not just observed. Your camera is a tool for that experience, but don’t let the viewfinder become a barrier. Put it down sometimes. Look up. Breathe. Feel the space.
The best photograph isn’t always the most technically perfect—it’s the one that captures what you felt in that moment. The awe. The wonder. The sense of standing inside something greater than yourself.
So plan wisely. Shoot thoughtfully. But also, experience deeply.
The Sagrada Família will still be here—still growing, still inspiring, still reaching toward heaven—long after your memory card is full.
Now go capture your vision of the divine.